A grid is just a container of nodes which each contain their own set of x/y/z coordinates. Although, you probably don't care about the Z axis.
Warcraft 3 already has it's own grid system which you can see in the World Editor when you press G. You can also see your Mouse coordinates in the bottom left corner -> Point: X, Y, Z. Unfortunately, you don't get direct access to this grid, so you'll have to layer your own custom grid on top of it, but that's not really an issue. My main point is that you can already see how the game handles it's own grid and use that as a frame of reference when designing your own.
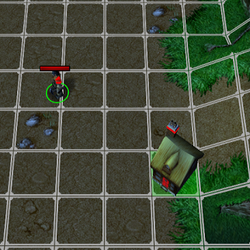
The map in the video is using what appears to be 128x128 sized nodes in their custom grid. This is the same size as a Farm or Scout Tower and if you press G in the World Editor you can see that this size is used in one of the 3 different grid sizes.
With that in mind, here's a very basic idea for getting you started:
-
 Set Variable Start_Point = (Center of bottom left corner region)
-
Set Variable Index = 0
-
Set Variable X = (X of Start_Point)
-
Set Variable BaseY = (Y of Start_Point)
-
 For each integer Row from 1 to 10 do Actions
-

 Loop - Actions
-

 Set Variable Y = BaseY
-
 For each integer Column from 1 to 10 do Actions
-
 Loop - Actions
-
Set Variable Index = (Index + 1)
-
Set Variable Grid_Point[Index] = Point(X, Y)
-
 Set Variable Y = (Y + 128.00)
-
Set Variable X = (X + 128.00)
This will create a 10x10 grid of Point variables starting from the bottom left corner of the map and generating up and to the right.
You should think of each Grid_Point as a
node in your grid.
You will probably want to save the Minimum X, Maximum X, Minimum Y, and Maximum Y coordinates of each Grid_Point in a Hashtable mapped to the Index. That way you can compare your Mouse coordinates to the coordinates of a
node to determine if you're moused over it. You will then want to use Images to create the actual visual that you see in the video, this isn't too difficult and there's resources on Hive that do this already.
Speaking of systems:
Due to the popularity of this resource, I have decided to update it to a Lua version. Note: The Lua upload utilizes both Bribe's Total Initialization and Eikonium's Debug Utils. Both of these are optional and not required to work. A simple grid system that allows for easier building/tower...

www.hiveworkshop.com